Laid Out

Patio Progress

You know that patio project I keep complaining about??

IT’S FREAKING DONE, EVERYBODY!

Here’s a little preview of the process. There are more involved notes to come, but we’ll be spending some time grilling, drinking, fire-burning, and relaxing for a bit first. Because that’s the whole point of the project, and apparently according to Target fall is already on its way.

1…2…3…4…I don’t want to cement no more…

A Coat of Paint Can Cure Most Ills

Or, maybe not, exactly. But it’s miraculous usually. I should really start a series like “what did we paint today?” because that’s how often we solve problems by painting.

Hey, as long as they’re solved…right?

patio chairs before after

On the left we have a hand-me-down patio set that was generously given to us by my in-laws (they’ve seriously furnished our entire outdoor space, thanks!!!) and although the overall shape was nice, they needed some sprucing up.

Materials you need: a rag, water, dawn, and paint. If you’re going the extra mile, you may want to hit the cleaned chair with some sandpaper, but our chairs were in pretty decent condition once we got them cleaned up. We used Rustoleum’s Hammered Spray Paint in the black, and while the effect wasn’t exactly what I would call “hammered,” the unhammered finish was great. There’s a real depth to the color that makes them black, but also sometimes bronze-y and sparkly. I am in love with them.

The process? Once your surface is clean and dry, apply paint by spraying in short bursts, moving a consistent distance from the surface. A tip when doing chairs: paint the bottoms first, then flip the chair over to do the top. We got away with a full coat and a touch-up coat, but we were doing dark on dark. Go, explore, play, repaint!

Something Super Cool is Happening

But I’m going to keep it a surprise. I want to keep you in suspense. If this isn’t enough suspense for you, go out and watch World War Z. That movie should really be called Anxiety because that’s what I felt throughout the whole thing. But I’m just being chatty.


kitchen

Here’s a preview of something cool that’s going to be happening. Was this shot in a billionaire’s resort in Turks & Caicos?? No, it’s just my kitchen, silly. But you’re so sweet to think that! (Note: I’m only this arrogant for your amusement, but I am really proud of my itty bitty kitchen.) Also, I obviously really love cutting boards.

-Niki

The Crown Jewel

The problem: ah ceiling scaryWhen we decided to remove the existing drop ceiling from our house, we were still young and naive. We believed that standard sized paneling would obviously go up to the existing ceiling and that we could just easily slap on some lovely, rich, crown molding and everything would be happily ever after.

Like everything else with home renovation…nope.

What actually happened was we seriously considered removing the paneling and starting from scratch. But after the nightmare of wallpaper removal and old horsehair plaster just crumbling below our fingertips, we realized that could be a little bit more trouble then we were willing to delve into. Instead, we decided to faux the hell out of that freaking molding.

For anyone who has never purchased crown molding, or who is (like I was) thinking that sheets of decorative wood couldn’t be that expensive, prepare yourselves for a rude awakening. Molding is hella expensive. Thank God I was too lazy to remove the floor molding because THAT THOUGHT CROSSED MY MIND OMG CAN YOU IMAGINE???

The Solution:

molding setup

First we bought floor molding, which is a lot cheaper than crown molding, because we needed an area to hide where the paneling ends. My solution to making it less like “hey you got floor molding on your ceiling?”: I flipped it upside down. Keepin’ it real, folks.

Next we decided that we don’t know how to cut mitered corners so we bought the wood corner blocks to solve that problem. I also liked that they added a bit more detail to the otherwise cheap floor molding.

Then we had to break down and buy a beefy-enough-to-look-nice but not-so-beefy-it-costs-a-million-dollars crown molding. Wood molding was WAY out of the budget clocking in at over $2.50 per foot. That would bring the cost at hundreds of dollars for FINISHING WORK. So we found a discount place that sells composite molding. It isn’t as strong and it isn’t as nice to the touch, but guess what? When that bad boy is up and painted…who the heck knows? Amirite?

The Result:

kitchen--allelujah!

Allelujah! Now isn’t that so much nicer?? Gosh, the effect helps give the room more of an architectural look while also camouflaging all that patchy grossness.

Now I know what you’re wondering…well, how did you do it?? I’ll tell you how!

Originally we were going to go with the same corner blocks we used on the bottom, but on the top, to avoid having to cut mitered corners. Well, the ones they sell for crown molding are ridiculously expensive. One block was around $20, times like 8 corners (inside and outside corners) for 1 room…you can see how that wasn’t going to happen for us. Instead we decided to bite the bullet and cut the damn mitered corners. With a Stanley miter box that costs like $15. Other supplies for the project included a finishing nail gun, a LOT of caulking…paint…and this youtube video:

Seriously, I would give you a step-by-step except we just did what this guy said. Dear guy, you helped us save hundreds of dollars by installing our own crown molding! You’re awesome!

What was life like before Google??

Niki

Raise The Roof

Actually, don’t. Please. Because we just got that bad boy done and I don’t want it going ANYWHERE.

Oh hey! Time for our bi-annual catch up sesh. What have we been up to? Oh, well you know. Everything.

Since wrapping up the major stuff on the inside, we decided to tackle the outside once the sun came out. We’re making pretty good progress. Some major hard-scaping has been happening, like resizing/reshaping the driveway. Installing a retaining wall. Ripping out very large, very stubborn hedges (Xris with a pick-axe is something to behold), repainting shutters, repainting the front door, digging out a patio…cementing said patio. It kind of goes on and on and on and on. So when it came time to do the roof (since our old one was, um, growing things…) we kind of threw down the shovel and got someone else to do it.

That and you know, that’s kind of a big job and we kind of have never done anything like it.

So, we didn’t DIY but LOOK! The fancy before and after!

Roof Before/After

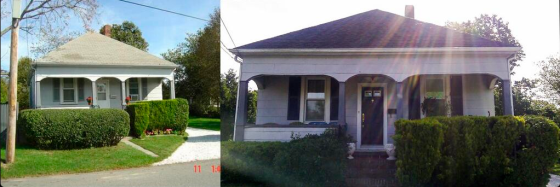
Do you see that lens flare? It’s like the heaven’s were even happy we got that sad state out from over our heads. WHEW!

Also, here you’ll see the new door/shutter situation. And my crazy uneven hedges. We have yet to tackle those. Until we get the back patio done though, I’ve hid the pick-axe.

Looking to get your roof done and wondering what to do? First, hire someone COMPETENT to do the work for you, unless you do roofs all the time, in that case, why are you even reading this?? A competent contractor will get your roof up quickly, securely, and also keep your property clean and tidy. Our contractors did the work in 2 days: one day to rebuild our chimney from the roof line, and one day to strip the old monstrosity and install. TWO DAYS. And they were out of our lives! (More like we were out of theirs, we kind of stay on contractors like clingy ex-girlfriends.)

Another reason to get a professional to do your work is because a roof isn’t something you want to slap together. They are licensed and insured. And they pulled all the necessary permits. What did we do? Go on about our daily lives, which was remarkable.

Note: If you live in the SouthCoast area and are looking for great work, definitely call Couto Construction. They were an absolute joy. (When was the last time you heard someone say that about a construction project??) Also they did NOT pay me to say this or anything, I just honestly really loved having them work for us and thought they deserved a shoutout.

Wondering what shingle we got? Our contractor had us pick from Certainteed Landmark shingles and I chose this baby:

LMPewterwood

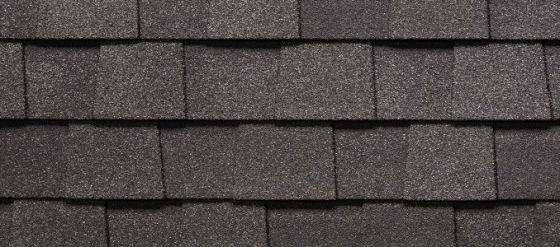
I don’t know exactly when in my life I started referring to roofing shingles as “baby” but, it’s called “Pewterwood.” Isn’t that fancy?? These are, obviously, the architectural style shingles and they come with a 50-year warranty. Which means I will never have to worry about roofing AGAIN since I’ll be elderly once the warranty is up.

So there you have it. New roof, new outlook on life–erm–well sorta.

More outdoorsy stuff to come!


The Power of Image

It’s been a long time.

I can’t even feel bad about it because this is a journal of sorts and although my plans were to update WHILE renovating, the reality is that for me that was impossible.

Life as a new homeowner has been bizarre. There are moments that are so hectic and busy that we forget to be human beings, and then they are quickly followed by periods of rest—boring, boring rest—that involve little more than Dr. Who episodes and frozen pizza. During the slow times I have had more than enough time to sort through photos and upload progress but the long and short of it is, I can’t bring myself to do it. I just soak up the downtime knowing that when we get back to it, I’m going to get by thinking back to the luxurious moments we spent on the couch.

But! Here’s an exceptionally fuzzy before and after photo. It’s fuzzy because it’s a camera-phone shot of the photo in progress on my computer. It’s like Inception with photos, almost.

Kitchen Before and After

It’s like a teaser, really. The goal here is for you to make out that A.) the before was HORRIBLE, and B.) The after is finished! Why the kitchen? Because we just put the crown molding up, oh say, this past weekend and officially nailed this room as done. (Except for curtains. We need those.)

More pictures to come at some point, they’re open on my desktop as I type this, and then you’ll get to see the glorious mediocrity of our finished kitchen! It’s not Dwell-worthy, but after seeing that before and knowing that we did ALL. OF. IT. BY. OURSELVES. makes me feel like I’m living in Elle Decor.

That and I serve the frozen pizza on a very fancy board.

So Much Closer

Warning: This post is a stream of consciousness.

That photo up there is already outdated, but a view of what’s happening in the house. It’s a million times better but still not finished.

Finishing work is my least favorite kind of work (even though it’s the least physically demanding) because you can spend hours wrapping something up and it pretty much still looks the same.

We have real floors in 4/5 rooms. HUZZAH!

The hardwoods really were just as beautiful as we thought. And they’re begging for murphy’s oil soap.

Plans change. We’ve added twice as many projects to the original to-do list since we began.

  • Weren’t supposed to touch the bathroom. But then the tub looked like something out of a hostel movie and I had a terrifying vision of what it would be like to wear flip flops in my own bathroom. +1 project.
  • Wasn’t supposed to do electrical in the kitchen. But then apparently nothing was ground-faulted (is that the word?) +1 project
  • Bedroom #2 was supposed to be a guest room. But that wallpaper really DEMANDED dining room. +1 project
  • The original molding idea was not working. Edit, edit, edit. Start from scratch. +3 projects
  • Just cut around the fridge to install new cabinets? Just demo the entire area and bump it out all Bob Vila style +1 project.
  • Oh back to the bathroom. We’re keeping the ceiling where it is. NO seriously, just keep it. Oh, shit…is that…what…? New ceiling build in the bathroom. +1 project.
  • HOW DID THEY LIVE WITHOUT A FAN IN THE BATHROOM!!!! (you get the idea.)

Anyway, by some miracle (brought about by the sacrificing of years off our lives due to so much stress and work.) we’re kinda/sorta on schedule and will be moving in the remainder of furniture and stuff all this week while still attempting to finish the finishing work.

Still got a hole in bathroom ceiling. Still got subfloor in my kitchen. Still missing all my wall cabinets (BECAUSE HOME DEPOT DOESN’T UNDERSTAND THAT IN-STOCK CABINETS SHOULD BE “IN-STOCK”. This leads me to go into a Seinfeld-like rant about how holding a reservation isn’t just about the “taking” as much as the “holding”. Side note: I’ve never said “I don’t think you do” to an associate as much as I have in the past month in my LIFE. )

Still waiting on my granite install. And kind of still upset about the free backsplash we were getting, but then weren’t getting because there wasn’t enough granite. Granite man, you’re so nice, but why tell me you’re going to give me something if you’re not sure and then take it away!!?? WHY?

And out.

Looking Up (Literally.)

Oh hay. Good morning. This post is coming to you from my aching shoulders and back. Not that I’m complaining, but reader, if you decide to DIY the majority of the remodeling in your house, HIRE someone to do the ceilings because it’s torturous. Right now we’re elbow deep in applying our textured ceilings (to our increasingly high ceilings) and the work is just terrible. But that’s enough of that.

To save our sanity from the exhaustion and fumes (only a couple weeks left! only a couple weeks left!) we escaped to Target the other night and I bought some nifty things for the house for the first time ever!!! Like completely fluffy, superfluous things that are fun and not found in the ceiling paint aisle of Home Depot.

Check out this Threshold pillow I’ve had my eye on for a while, which originally retailed for $29.99

I picked this bad boy up for around $7! (Who pays $30 for a pillow??) I love the pattern and the colors, and although it’s not very cozy–it’s like a burlap-y fabric–I’m super excited to plop this down on the couch. You know, when my living room resembles a living room and not a war zone. NEXT!

During the homebuying process when I couldn’t spend a dime while I was scrutinized by the financing people, the “boutiques” at Target came out and I LOVED the homegoods from the Curiosity Shop. But I couldn’t buy them. And that led me to much sadness.

 Lo and behold! These oversized mugs were just waiting to be picked up for $3 a piece! We didn’t get the plates, although I wish they still had them left. But I’ve been dreaming about a tiny coffee station (A La Steph) where I can display these and enjoy a gargantuan cup of Joe every morning!

I know they’re not much but just these couple purchases have brought me some hope during the endless project that has been ceiling makeover. I can’t wait until we have a functioning home to place these in!

P.S. Another step in making our home functioning is flooring in the three rooms were working on right now. Although we found gorgeous hardwoods in the living room, the bedrooms have unfortunately suffered a different fate. So we’re cutting our losses and compromising with some carpeting. Tomorrow the carpet people will be measuring out the rooms and hopefully by next week I’ll have this sweet thing installed:

It’s Chatsworth from the Martha Stewart Living Collection in “nimbus cloud”. Hopefully it’ll look as nice as I think it will once it’s all installed!

Cheers!

Turning a Corner

So it’s officially been a week since closing (yay!). They say when you become a first time homeowner you learn a lot of things you never thought you’d learn. Well, in the past week, Xris and I have learned how:

  • To remove existing flooring
  • To remove wallpaper (chemical free!)
  • To remove drop ceilings
  • To uninstall existing light fixtures
  • To rewire for new light fixtures (instead of just busting a hole through the side of the wall like no big deal. SHAME!)
  • To install drywall to fashion a new ceiling (still so sorry about your back, Sean!)
  • To fill/patch holes in plaster
  • To plaster. In general
  • To tape and skim-coat (Not to toot my own horn here, but I skim-coat like a boss.)
  • To scrape existing shitty paint and prep existing ceilings for revival.

All things we had zero experience and knowledge about one week ago. Not bad right? I know we’re up for a reaaaaaaaaaally huge screw-up at some point but at least we have these victories to look back on. I know we’re not alone here, many a homeowner before us has been thrust into this stuff and tackled it like pros. But considering we literally have NO idea what we’re doing here (thank God Home Depot is only like 10 minutes away…) we have at this point taken about 50% of the house from this:

and this:

to THIS:

I made it all big because it’s very exciting. (this is the same corner from the previous shot BTW.) Also the photography will get better when the entire house isn’t a danger zone and I’m not afraid of destroying my camera.

That’s only a couple coats of primer, and I’m not a fan of white walls, but God almighty that is leaps and bounds from where we started. And now that we know that we can somehow revive crumbling, stained, and moldy walls to crisp and clean walls, we’ve got our second wind to take this magic into the living room and kitchen.

Also just a note, we thought those blinds and the trim were white BEFORE we primed, that’s how grimy everything is.

At this rate our house will actually look like a house instead of a horror-movie-haunted-cabin right on schedule.

And just because it must be said: prepping peeling ceilings for priming is horrible work that I would not wish upon my worst enemy.

But let’s be serious, those don’t look like 100+ year-old walls do they??? Naaaah they don’t. I’m going to go baby-talk them now.

Cheers!